
Vite 模板语法
场景
当一套代码,需要发布到两个环境(
A环境和B环境)中时,A环境下需要系统管理页面,B环境下不需要系统管理页面。这时,我们可以通过后端返回的菜单控制。但是如果
A环境和B环境的登录页面也不一样呢?这时,我们就可能需要模板语法来控制。需要自定义一个
vite插件,在打包前,读取环境变量,然后使用 blueimp-tmpl 的模板语法对代码进行判断并替换。
项目地址
实践
安装依赖
blueimp-tmpl 模板语法
1
npm install blueimp-tmpl
cross-env 跨环境执行命令
1
npm install cross-env -D
获取环境变量
在
package.json文件中添加scripts脚本1
2
3
4
5
6
7
8"scripts": {
"dev": "npm run dev:A",
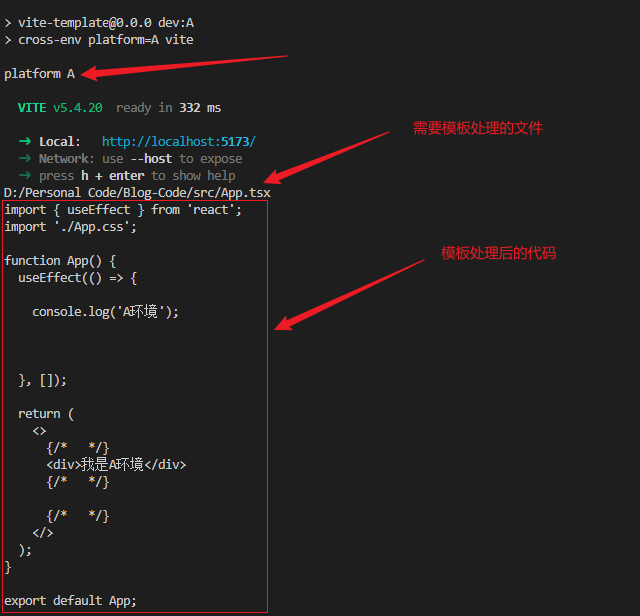
"dev:A": "cross-env platform=A vite",
"dev:B": "cross-env platform=B vite",
"build": "npm run build:A",
"build:A": "npx rimraf dist && cross-env platform=A vite build",
"build:B": "npx rimraf dist && cross-env platform=B vite build",
},platform=A和platform=B是自定义变量。只要是xxx=xxx这种格式的变量,都可以通过process.env.xxx拿到。在
vite.config.ts文件中获取环境变量1
2
3
4
5
6
7
8
9
10
11
12import { defineConfig } from 'vite';
import react from '@vitejs/plugin-react';
// https://vite.dev/config/
export default () => {
const platform = process.env.platform; // 获取环境变量
console.log('platform', platform);
return defineConfig({
plugins: [react()],
});
};执行
npm run dev:A或者npm run dev:B,可以在 启动窗口(终端) 中看到打印的platform变量值
使用 Vite 插件
在项目根目录下创建
vite-plugin-blueimp-tmpl.ts文件,添加下面内容1
2
3
4
5
6
7
8
9
10
11
12
13
14
15
16
17
18
19
20
21
22
23
24
25
26
27
28
29
30
31
32
33
34
35
36
37
38
39
40
41
42
43
44
45
46
47
48
49
50
51
52
53// @ts-ignore
import tmpl from 'blueimp-tmpl';
import { Plugin } from 'vite';
interface Options {
/** 匹配内容 */
match?: RegExp;
/** 匹配文件 */
test?: RegExp;
/** 模板数据 */
data: Record<string, any>;
}
/**
* 模板插件
* - 匹配文件中的 //tmpl 内容
* - 使用 blueimp-tmpl 进行模板编译 {% ... %} 中的表达式
* - 通过 o.xxx 访问 data 对象中的数据
* @example //tmpl {% o.name %}
* @example
* //tmpl {% if(o.platform == 'A') { %}
* xxx
* //tmpl {% } %}
*/
const vitePluginBlueimpTmpl = (props: Options): Plugin => {
const { match = /\/\/tmpl/g, test = /src.+\.ts(x)?/, data = {} } = props;
return {
name: 'vite-plugin-blueimp-tmpl', // 插件名称
enforce: 'pre', // 在 Vite 核心插件之前调用该插件, 打包之前运行
transform: (code: string, id: string) => {
// id 是文件路径, code 是文件内容
if (test.test(id) && code.match(match)) {
// 会将 //tmpl 替换为空
const str = code.replace(match, '');
/**
* 使用 blueimp-tmpl 进行模板编译,
* - https://www.npmjs.com/package/blueimp-tmpl#api
* - 解析 {% ... %} 中的表达式, 并将 data 对象中的数据传入模板中
*/
const tmplstr = tmpl(str)(data);
console.log(id); // 打印出被处理的文件路径
console.log(tmplstr); // 打印出处理后的文件内容
return tmplstr;
}
},
};
};
export default vitePluginBlueimpTmpl;在
vite.config.ts文件中添加插件,并传入platform环境变量。(需要将vitePluginBlueimpTmpl放在插件最前面,方便拿到未编译的代码)1
2
3
4
5
6
7
8
9
10
11
12
13import { defineConfig } from 'vite';
import react from '@vitejs/plugin-react';
import vitePluginBlueimpTmpl from './vite-plugin-blueimp-tmpl';
// https://vite.dev/config/
export default () => {
const platform = process.env.platform; // 获取环境变量
console.log('platform', platform);
return defineConfig({
plugins: [vitePluginBlueimpTmpl({ data: { platform } }), react()],
});
};
使用模板语法
在
src/App.tsx文件中添加下面内容1
2
3
4
5
6
7
8
9
10
11
12
13
14
15
16
17
18
19
20
21
22
23
24
25
26
27
28import { useEffect } from 'react';
import './App.css';
function App() {
useEffect(() => {
//tmpl {% if(o.platform == 'A') { %}
console.log('A环境');
//tmpl {% } %}
//tmpl {% if(o.platform == 'B') { %}
console.log('B环境');
//tmpl {% } %}
}, []);
return (
<>
{/* //tmpl {% if(o.platform == 'A') { %} */}
<div>我是A环境</div>
{/* //tmpl {% } %} */}
{/* //tmpl {% if(o.platform == 'B') { %} */}
<div>我是B环境</div>
{/* //tmpl {% } %} */}
</>
);
}
export default App;此时启动项目,
访问页面之后,在启动窗口(终端)中可以看到编译后的代码(必须访问页面后终端才会打印!!!,因为vite是按需编译的)
部署
- 最后在
CICD流水线上只需要添加npm run build:A或者npm run build:B命令,就可以实现环境切换了
本博客所有文章除特别声明外,均采用 CC BY-NC-SA 4.0 许可协议。转载请注明来源 小四先生的云!
相关推荐

2025-01-12
Qiankun + Vite 实现微前端
介绍 Lerna 是一个快速、领先的构建系统,用于管理和发布来自同一源码仓库的多个 JavaScript/TypeScript 软件包 Qiankun 是一个基于 single-spa 的微前端实现库,在帮助大家能更简单、无痛的构建一个生产可用微前端架构系统 Vite 是一个超快的前端构建工具,赋能下一代 Web 应用的发展 思路 主应用 app 配置四个菜单 App、 App1、App2、App3 菜单 App 链接主应用 app,可以调用子应用 app1、app2、app3 菜单 App1 链接子应用 app1,样式未隔离,组件库样式未隔离 菜单 App2 链接子应用 app2,样式未隔离,组件库样式隔离 菜单 App3 链接子应用 app3,样式隔离,组件库样式未隔离 项目地址实践包版本 node: 18.20.7 npm: 10.8.2 lerna: 8.1.8 vite: 6.1.0 qiankun: 2.10.16 node 版本小于 18 注意以下几点 所有应用 使用 Vite: 5.4.11 所有子应用 安装 vite-plug...

2025-10-23
前端监控方案
常见监控方案 Sentry:一个开源的、实时的错误监控平台。功能全面、一站式解决方案、多端支持。强烈推荐!!! Web-See:前端监控 SDK,可用来收集代码报错、性能数据、页面录屏、用户行为、白屏检测等个性化指标数据并上报。支持多种错误还原方式:定位源码、播放录屏、记录用户行为 WebTracing:一个基于 JavaScript 的埋点 SDK。为你的前端项目提供【 行为、性能、异常、请求、资源、路由、曝光、录屏 】监控手段 演示地址项目实践思路 优先看 Web-See 文档 使用 Vite + React 创建项目,复刻 Web-See-Vue-Demo 不上报错误,把报错信息存储到 IndexDB 中,通过 idb-keyval 操作 IndexDB 线上出现问题时,下载 IndexDB 中的数据,在后台管理平台中导入并查看问题 项目介绍 从 项目地址 拉取示例代码,通过 pnpm install 安装依赖 核心文件是 src/monitor,里面封装了写入数据到 IndexDB 的方法,以及下载数据到本地的方法 由于 IndexDB 存储数据大小...

2024-11-13
Qiankun + Vite 多个子应用共存
介绍 最初接触 umi 微前端 时,感觉这个就是两种子应用的加载方式 路由匹配方式 手动加载方式 后来在网上看到大佬的发的这个文章 探索微前端的场景极限,才发现这个实现不简单,引用了大佬的话: 在应用 A 中通过调用 loadMicroApp(B) 的方式唤起微应用 B,然后在微应用 B 中通过 loadMicroApp(C) 的方式唤起微应用 C,通过这样的调用链路即可很完美的完成产品上的诉求。 但是现实情况往往没有那么简单,前面提到过,若想要 loadMicroApp API 能符合预期的运行,我们需要确保被加载的微应用是不含自己的路由系统,否则会出现多个应用间路由系统互相 抢占/冲突 的情况。 这种场景下,我们其实只需要确保微应用的路由系统不会干扰到全局的 URL 系统即可。幸运的是 react-router 的 memory history 模式很好的解决了这一问题。 思路 主应用 app 有链接两个子应用 app1 和 app2 子应用 app1 可以通过 loadMicroApp(app1) 的方式打开子应用 app2 仓库地址项目搭建...

2025-11-30
微前端SDK@0.5
路线规划 规划图地址 更多详情 快速开始1234# 安装 @zxiaosi/sdk 对应的版本 0.5.xnpm install -g @zxiaosi/create-sdknpx create-sdk 提示 所有模板都排除了 react-dom,这将导致 HMR 失败。请安装 React 开发者工具. 项目介绍 整个 SDK 都是围绕 getRoutesApi、getUserInfoApi 这两个接口进行设计的,旨在简化微前端应用的开发 getRoutesApi 接口用于获取应用路由信息,包括主应用和微应用的路由配置。因为 Qiankun 的 entry 配置比较特殊,所以 主应用 需要使用 vite-plugin-mock 插件 mock 接口 在本地开发是本地服务 "entry": "http://localhost:5174" 在生产环境是文件路径 "entry": "/subapp/" getUserInfoApi 接口用于获取用户相关数据,以便进行权限控制和个性化设置。...
2026-06-21
微前端SDK@1.0
项目介绍 整个 SDK 都是围绕 sdk.app.user、 sdk.app.menus、sdk.app.microApps 进行设计的,旨在简化微前端应用的开发 主应用 sdk.use(plugin, opts).mount('sdk') → 微应用 sdk.extend('sdk') → 共享同一套状态与能力 架构图 架构图地址 快速开始123npm install -g @zxiaosi/create-sdknpx create-sdk 具体使用主应用 创建 Vite 项目 1npm create vite@latest 安装 @zxiaosi/sdk、react-router-dom@6、qiankun 依赖 1npm install @zxiaosi/sdk react-router-dom@6 qiankun 在 src 文件夹下创建 sdk.config.ts 文件,并进行 SDK 的配置 123456789101112131415161718192021222324import { sdk, SDKA...

2024-11-28
Qiankun + Vite 样式隔离解决方案
问题 Qiankun + Vite 作为子应用时,样式隔离无效,即使配置了 experimentalStyleIsolation: true 也无效 Ant Design 组件库样式隔离无效 解决方案 使用 Postcss-Prefix-Selector 插件为样式添加前缀 Ant Design ConfigProvider 配置 prefixCls 样式前缀 配置插件样式隔离 在子应用 vite.config.ts 中配置 postcss-prefix-selector 插件(官方示例) 1234567891011121314151617181920212223242526272829303132import prefixer from 'postcss-prefix-selector';export default defineConfig({ css: { postcss: { plugins: [ prefixer({ prefix: '[d...
评论